%20(1).png)
Worldpay for Platforms Hosted Invoices
Introduction
This developer guide for implementing the Worldpay for Platforms hosted invoice will allow you to integrate our payments platform to start accepting eCommerce payments including Card and ApplePay / GooglePay, as well as PayID in Australia. This simple Hosted Invoice is a payment solution that allows for generation of a payment reminder URL which can be embedded in an email and sent to a customer. This email holds the “Pay Now” button which re-directs the customer to our Hosted Payment Page for secure payments.
The invoices can remain in the system under different statuses including:
Pending
Over Due
Paid
Unlike the Hosted Payment Page token which is valid for 20 minutes and expires if no action is taken, this Simple Invoices has no time limit.
Worldpay for Platforms Hosted Invoices flowchart
API steps for Hosted Invoices
As the name suggests, simple invoice payments is a simple invoice. You generate an invoice via the - POST Add a new invoice API.
From here the invoice must be paid by the customer or you can void the invoice in the system.
We recommend utilising both API calls below together to determine the invoice status and payment result:
One of the reasons for this is you will not see an attempted transaction by the customer if the payment attempt was rejected when only utilising - GET Search for multiple invoices.
Recommend calling our GET Search for transaction status changes once at around 9AM AEST and then again at 3PM AEST as a general timeframe daily which will pull a set of all transactions for your business that have had a change of transaction status.
When an invoice is paid successfully, the transaction 'statuscode' will be a ‘C' (Cleared - Card Debit)
Typically there is a 2 business day time-frame from clearing and settling the funds to the merchant’s nominated bank account. Once the funds have been settled to the merchant’s account, the transaction 'statuscode' will return an 'S' (Settled) status.
When an invoice payment has failed, the transaction ‘statuscode’ will display ‘R'. If a decline reason is supplied by the issuer, we will return this response. Refer to Transaction Sub-Status Code.
If a transaction is rejected, some decline responses by the card issuer return a generic reason, so it’s not always possible to know exactly why the payment was declined. If all of the information seems correct, it is best to have your customer contact their card issuer and ask for more information. For privacy and security, financial institutions are only obligated to discuss the specifics of a declined payment with their card holder.

Following the above API, use our POST Acknowledge transaction status change to acknowledge the transactions and remove them from the data set when you next call the Get New Status Search above.
If the transaction status changes again after you have removed it from the data set, it will be returned in the GET Search for transaction status changes to notify you of the change in status.
Test Card details
Within the Sandbox environment, you can test card transactions using the card examples below:
CVC = Any 3 digit number
Expiry Date = Any future date
Card Type | Test Card Numbers |
|---|---|
| 4111111111111111 |
| 5353535353535351 |
| 378282246310005 |
3DS Test Cards to test different cases
When testing the 3DS supports a few different card numbers for triggering different scenarios:
Frictionless Success | Frictionless Fail | Challenge Required |
|---|---|---|
4907639999909022 | 5283901906612672 | 4918914107195005 |
4016360000000010 | 4016360000000028 | 4016360000000093 |
5188340000000011 | 5188340000000029 | 5188340000000060 |
How to test wallet payments (Apple Pay / Google Pay)
Your device will need to be linked to either Apple Pay or Google Pay in order for the type of wallet payment to be available to select on our Hosted Payment Page. Any transactions pushed through the Sandbox environment will not process / deduct funds from your account.
How to simulate failed transactions?
When using the test API, the transaction amount gives you the ability to test both successful and failed payments. When the transaction amount has zero cents or a number of cents other than the ones listed below, the test transaction will always be successful. If you provide one of the following numbers for the number of cents you will receive a transaction failed response with the corresponding reason:
31 = Invalid Account
54 = Expired card - Card Only
51 = Declined
61 = Insufficient Funds
96 = Technical failure - Card Only
How to simulate PayTo agreement and payment flow - Australia only
Action Agreement
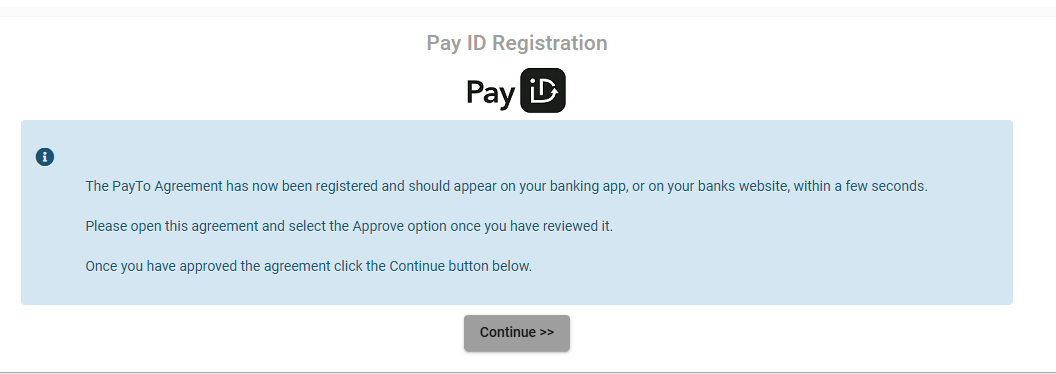
Once an invoice has been generated and you select PayID as the payment option, complete the page by selecting PayID Type and entering your PayID information, then click continue:
Once you have entered your PayID information, you will be directed to this page below. Do not click Continue at this time. Follow the next steps below.
Open a new window or tab and log into the Sandbox Portal
Once logged in, click on PayTo heading
Search for the PayID Agreement via the Payer or Transaction reference you specified in the API request then view the Agreement by clicking the icon on the right hand side as highlighted in yellow below:
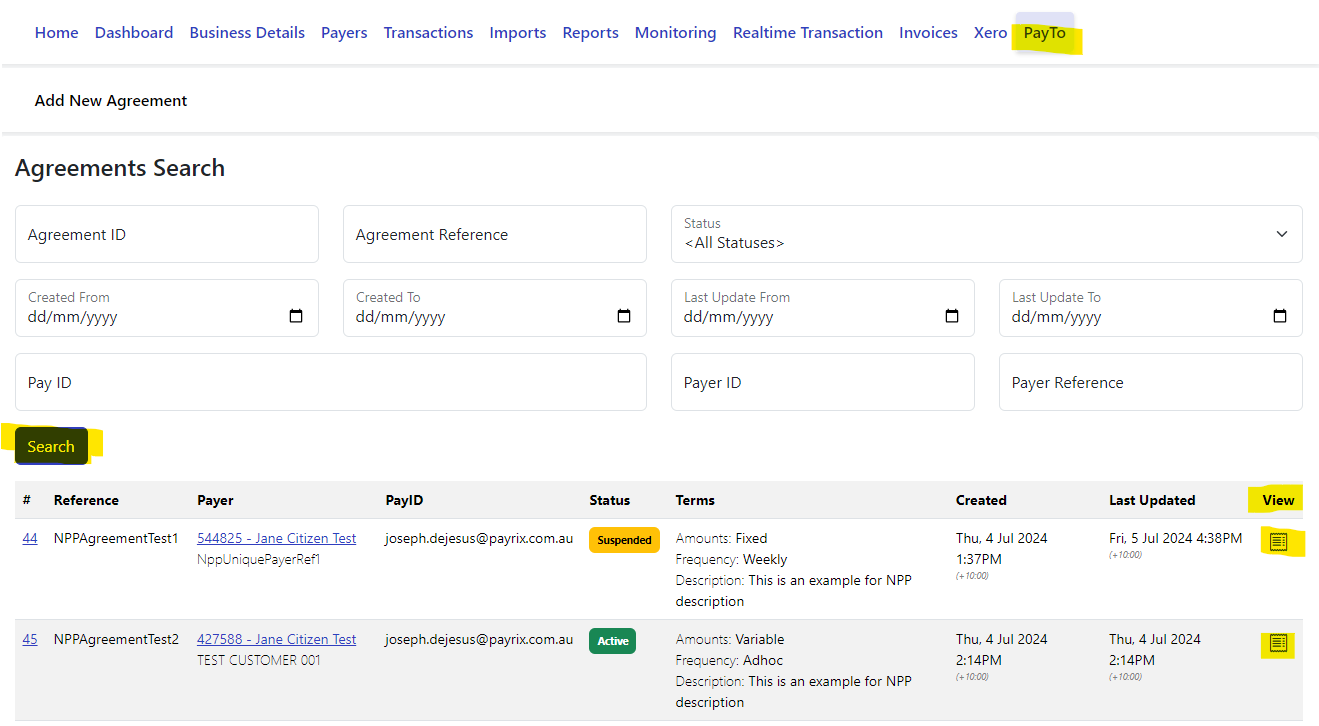
From here, click ‘Action Agreement’
Here you can use the ‘Sandbox Self-serve’ function to simulate responses to trigger agreement updates or change the status of the agreement and the sending of their associated webhooks.
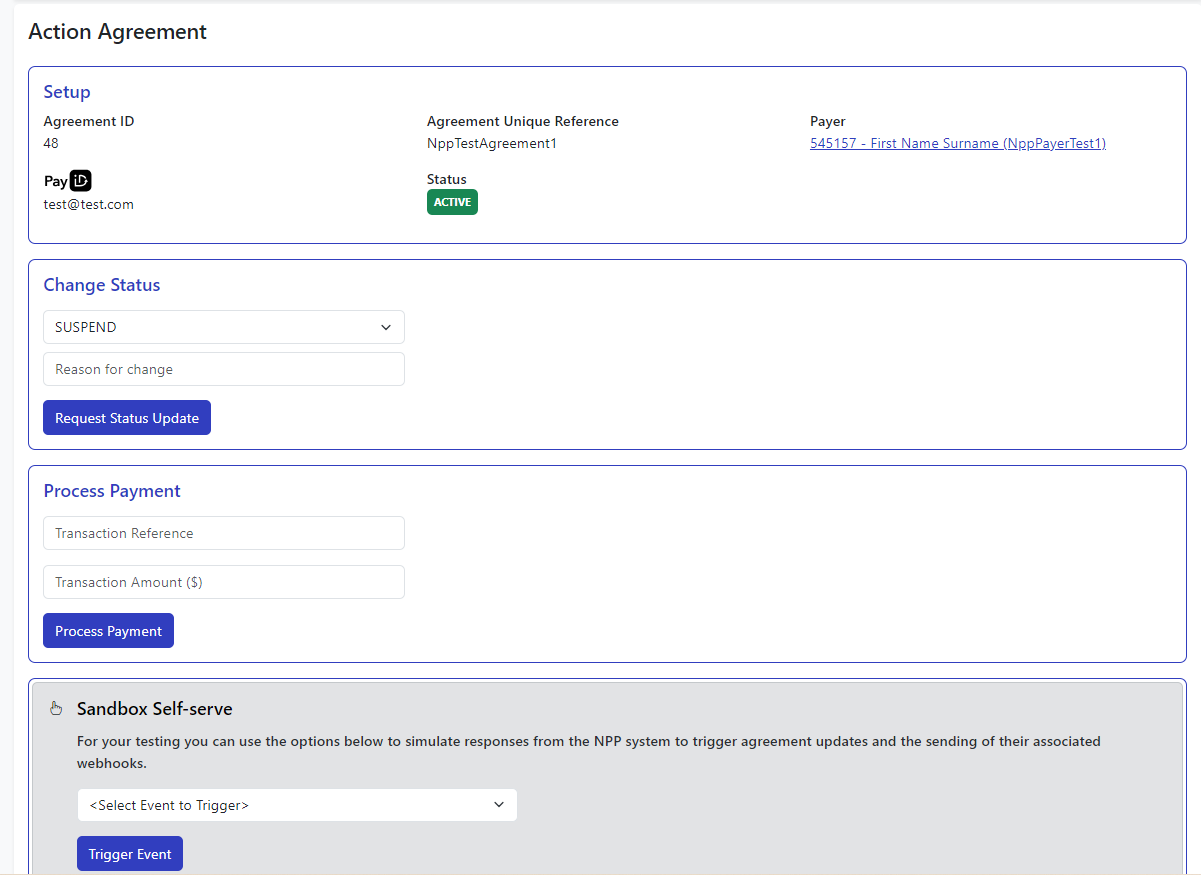
If you select Payer Action:Agreement accepted, go back to the payment page then click continue. Once you have clicked continue, follow the next steps below to trigger a successful or failed payment.
If you select Payer Action:Agreement declined, go back to the payment page and you will see that the HPP returns you the the initial payment form to re-attempt the payment via Card or PayID.
Next step - Trigger successful or failed payment
Once you trigger the PayTo Agreement Acceptance above, you will need to progress the payment to a successful or failed payment to finalise the payment flow in Sandbox.
As you should still be logged into the Sandbox Portal from the above steps, click back to the PayTo heading once more.
Search for the Agreement you just actioned and Click View

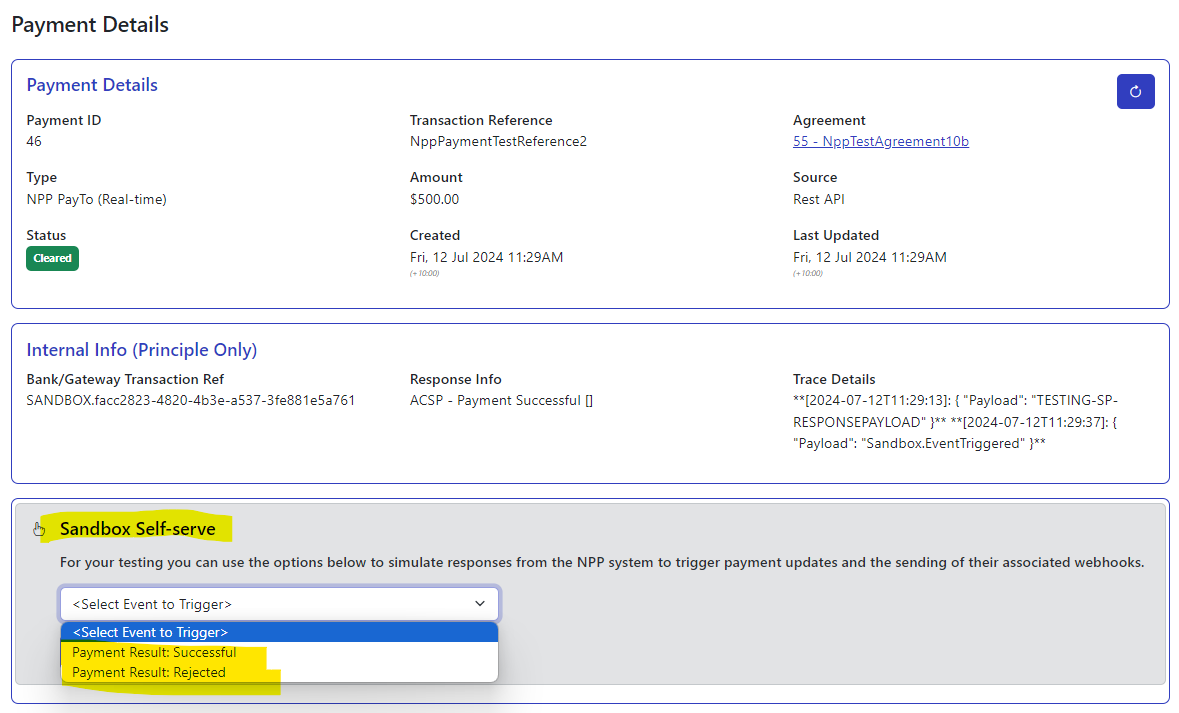
When you enter the agreement page, Click View in the ‘Payment History’ section

You will then be directed to the Payment Details page. Scroll down and use the Sandbox Self-Serve and to trigger a successful or failed payment event.
You can use the PayTo Self-Serve function along with the standard ‘Self-Service Centre’ to run the settlement process once payments have been processed and successful/cleared.